Yard building installation instructions (PDF version)
Please read the following instructions carefully before starting to assemble the product. It helps to avoid mistakes and damages when assembling the product and possibly speeds up the assembly and you can finish the cabin earlier!
If you have no previous experience in assembling buildings or construction work, in that case Vierasmaja.fi strongly recommends asking a local professional carpenter, builder or do-it-yourself expert for advice or using a professional Vierasmaja.fi installation team. Errors related to assembly may cause expensive repairs and you have to wait while you wait for replacement parts, and the five-year warranty given by Vierasmaja.fi may be invalidated.
NOTE: Please refer to the product specification list and wall plans to ensure that you have received the complete product and it is undamaged. You can get information about the quantities and dimensions of all parts from the specification list.
Do not throw away the building packing list before the warranty period expires or write down its number. This number is only given to your yard building, and all factory information is linked to it. This packing list number is needed in case there are claims or warranty questions.
All dimensions in the assembly instructions are given in millimeters (mm). We reserve the right to carry out technological development of the products, which may cause small exceptions and differences compared to the images . You must file a claim for damaged and defective parts before assembling the product or the warranty is void ( not valid ).
The Vierasmaja.fi product you ordered is made of a completely natural material – wood, and that means that its structure is “living”. So the boards may have some changes or small cracks or knots and they can never be completely excluded or prevented. The variable wood texture is a typical characteristic of Nordic spruce. The occasional rough edge or machine marks on the roof boards or floorboards are due to the production process and are not representative of quality or production-related defects.
Our trees come from environmentally friendly and environmentally friendly forests, and they have not been chemically treated (except for impregnated baseboards). Therefore, the wood may turn gray over time. It can be avoided by painting the surface of the wood with a suitable wood treatment agent, paint or other covering intended for finishing wood . The wall boards do not need to be painted before the house is installed, and it is best to do it in rain-free weather after the house assembly is complete. If you want to paint some individual parts with different colors, it is good to do it before assembling the house. It is also recommended to impregnate the boards that will be below the floor before you start assembling the house.
Note that good air conditioning and prevention of moisture accumulation are the best ways to protect the garden building from rotting.
Warning! Before and after installation, protect the wood from prolonged exposure to sunlight and/or moisture, as they may cause the boards to warp. After the garden building is assembled, it should be treated with a protective wood treatment as soon as possible.
1 Assembling the product
A good foundation is extremely important for the safety and durability of the garden building. Only a flat, uniform and stable foundation guarantees the complete success and stability of assembling the planks, as well as the fit of doors and windows. Vierasmaja.fi helps you to plan a suitable place for the foundation, and takes into account the characteristics of the soil that will become the foundation and your wishes when handling the matter. You can get a more uniform foundation for medium-sized and large garden buildings by laying paving slabs on top of gravel and sand and concrete. The most effective and easiest way of all is to place building blocks (on top of a gravel or sand-type substrate) when small yard buildings are in question.
If your yard building requires a concrete base, pillar foundation, or something similar, we recommend that you contact a local hardware store or contractor, unless you are sure that you know how to pour the foundation yourself.
You will need the following tools: hand saw, screwdriver, rubber mallet, hammer, cotton wool, tape measure, drill, knife, pliers and a ladder.
Open the package on the day of installation. Don’t get confused by the number of parts. When you organize them ahead of time using the plan and inventory list that comes with the log cabin package, installation can potentially be easier! Before starting to install the product, check the contents of the package and compare it with the specification list. The sketch provides an overview of the installation. It is very important before assembly and installation that you pay attention to the number of individual parts when disassembling them.

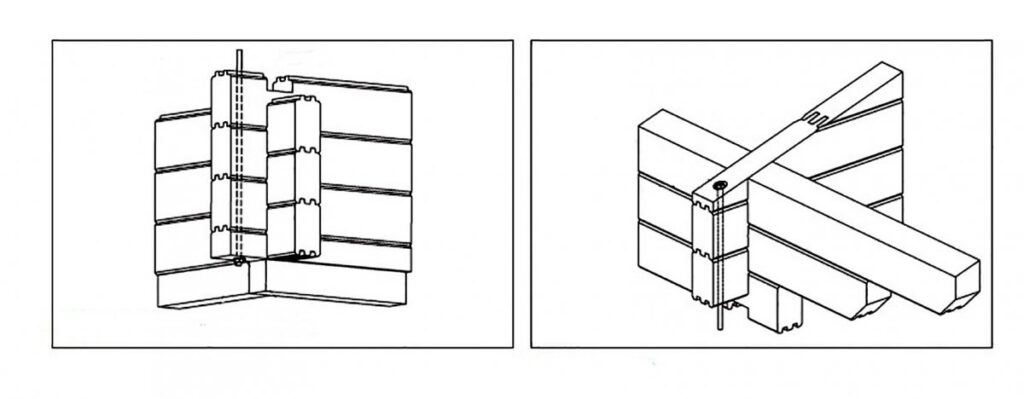
Buildings with walls thicker than 44mm require you to install threaded rods in pre-drilled holes. You can insert the rods through all the holes built into the wall . If even one of the planks is misaligned, you cannot place bars along the entire length of the wall. Apart from the pre-drilled holes, the planks are identical, so you need to note where the holes are located! It’s easy when you follow a plan.

Place the impregnated base planks on top of the foundation according to the sketch that comes with the package. A moisture barrier layer (e.g. roofing felt or something similar), which is placed on top of the base and bottom planks, protects the courtyard building from moisture and mold/rot . The order of the floorboards gives the exact dimensions for installing the wall elements. The soles may vary between different models. Follow the foundation plan that comes with the kit.
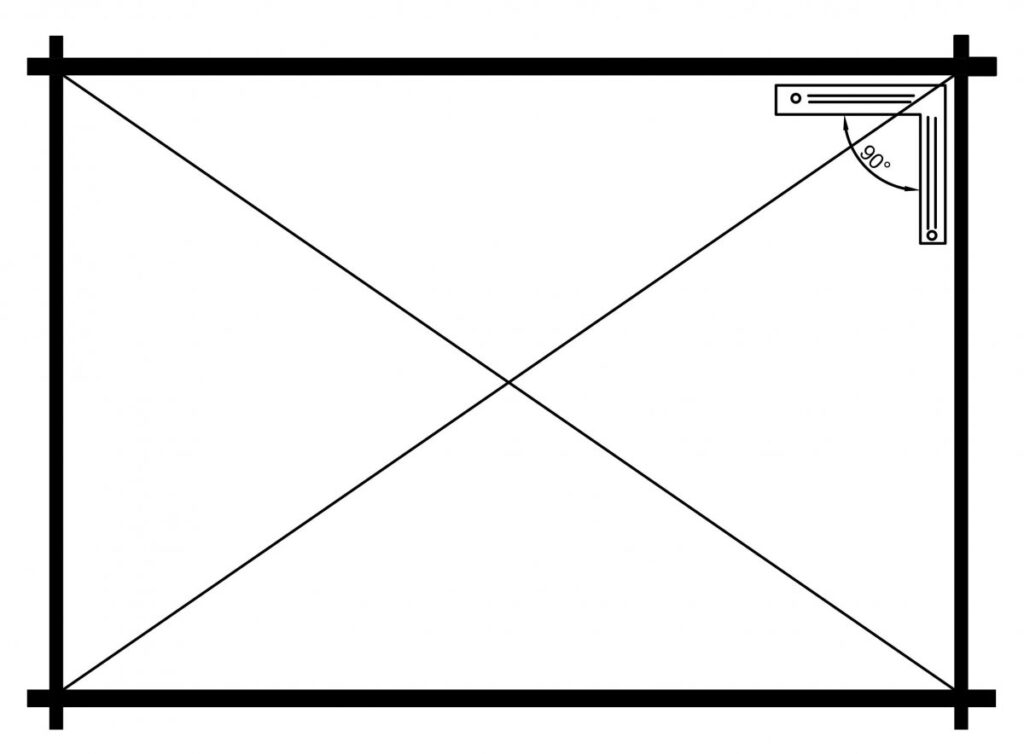
Screw the outer planks together first. Make sure that their sizes correspond to the floor plan of the building and compare their diagonals, because they must be the same length . Successful further installation of the building goes well if the foundation and base planks are installed horizontally and correctly. If you use concrete for the foundation, there should be no depressions in it, because the angle of inclination is strengthened many times when you have assembled all the wall boards.
2 Construction of walls and installation of windows and doors
After first assembling the entire structure at a tight right angle, fasten the first layer of boards where the wood in the foundation joins using long screws. Drill a pilot hole first.
The remaining wall boards are assembled according to the floor plan of the cottage without using screws. Some parts of the wall are additionally supported by metal rods, which are placed in pre-drilled holes. See the wall plan.
If necessary, use a rubber mallet or wooden slab throughout the assembly process to gently move the parts into place. Make sure you never hit the dowel head with a metal hammer.
After the installation of the sixth board, compare the piercers, they should be equal.
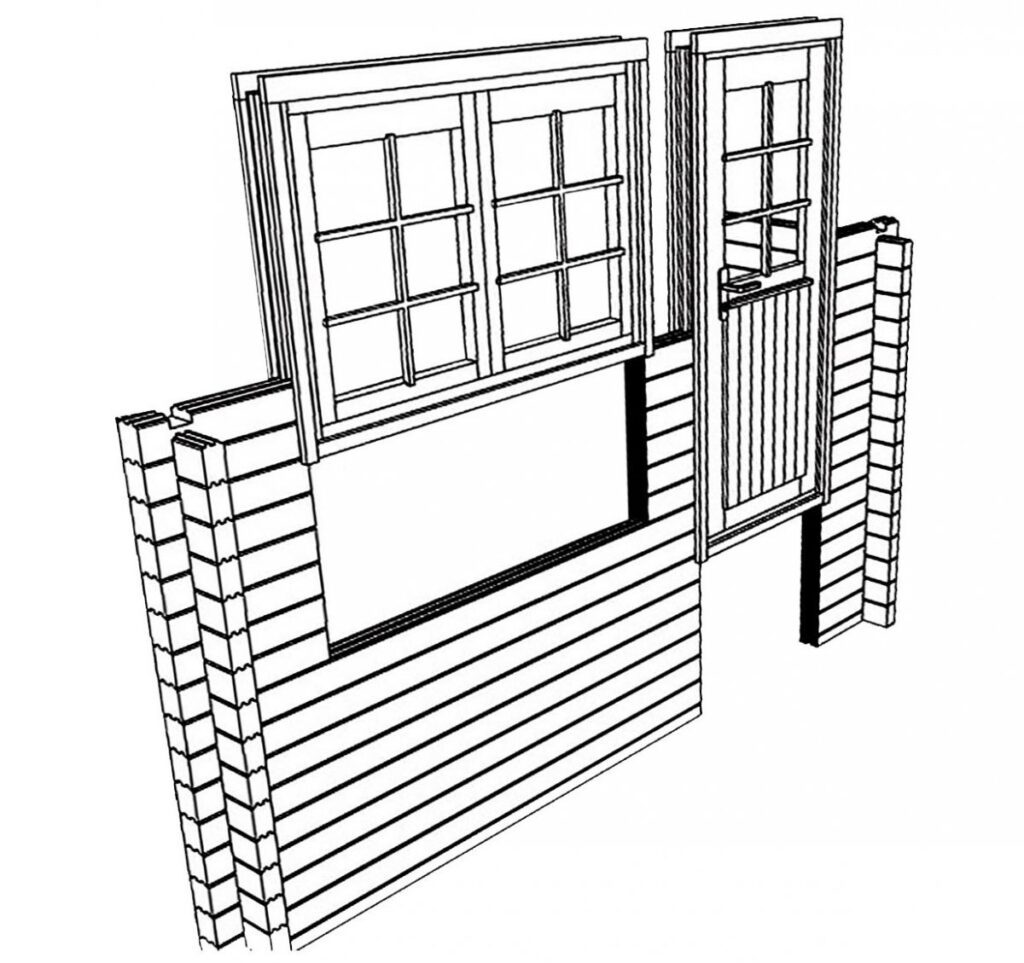
Build the walls according to the wall plan, one board layer higher each time and add a window to the height indicated by the wall plan. In most of the models, the decorative window moldings are included as separate parts. Attach the four outer and inner trim pieces with screws and place the window in place when the window opening is half its final height.
Windows can also be installed at a later stage, when the walls and roof are finished. In this case, screw the outer decorative boards in place and insert the window. After that, screw four decorative moldings from the inside to the window. The decorative moldings must always be screwed to the window and never to the wall boards.
The window openings are always a few centimeters wider and higher than the windows. This is important because in this way all pressure on the window can be avoided during the first years when the walls “settle” into place.
Vierasmaja.fi offers various window models. See detailed information about the windows in the specification list.
Doors are installed in the same way as windows, except unlike windows they only have three slats; one top list and two side lists, but no bottom list. The frames of the double doors come in four parts, and they must be screwed together and then the moldings must be joined, the door frames installed in the courtyard building, the slats/mouldings connected and the door raised on the hinges.
We recommend installing the doors after the walls are finished, the ceiling is installed and just before the floorboards are installed. See also the detailed specification list.
The wood “sets in place” a few months after the building is assembled. If necessary, doors and windows should be adjusted to avoid all rubbing and getting caught.
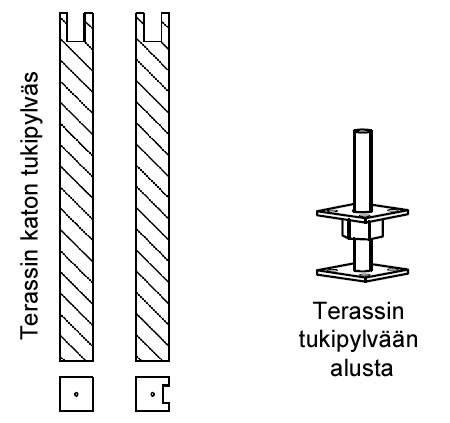
3 Installing vertical supports for the roof of the building
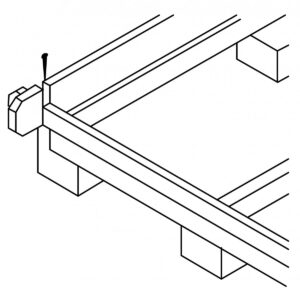
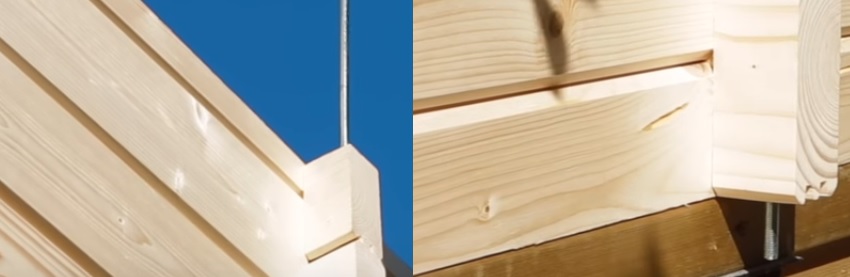
Many Vierasmaja.fi courtyard buildings with large canopies also have support columns. The support posts must be cut to the correct length and installed according to the floor plan of your building. Cut the post so that there is a gap of five centimeters between it and the bottom board, so that you can install the adjustable metal stands . Insert the metal stands into the pre-drilled holes at the bottom of the support post. The stands must be screwed to the baseboards.
4 Installation of wind and storm shelters 44-92 mm for buildings
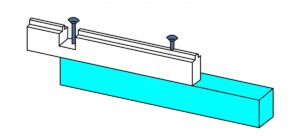
In buildings with walls thicker than 44 mm, threaded rods must be installed in pre-drilled holes according to the wall plan. These threaded rods may come in 2-3 parts. Screw the parts together and install according to the wall plan. Storm shields must be attached with nuts. It should be done with your fingers so you can make sure you don’t tighten them too tight. In this way, it is possible to avoid pressure and strain on your building after the first few years after the building is assembled, when the wood “settles” into place. Cut off the ends that are too long .
Wooden storm shelters for 28mm buildings must be installed in the last stage of assembly. These instructions follow the last step of the setup guide.
5 Installing the roof ridge (apex).
When all the walls are assembled, it is time to install the end pieces, if you are assembling a building with a gable roof, place the roof beams. If you are assembling a building with a flat roof or a hipped roof/side roof, go to the next section “how to install flat-roofed, balustraded Vierasmaja.fi yard buildings”.
Push the roof beams properly into the recesses at the ends. If necessary, tap with a rubber mallet.
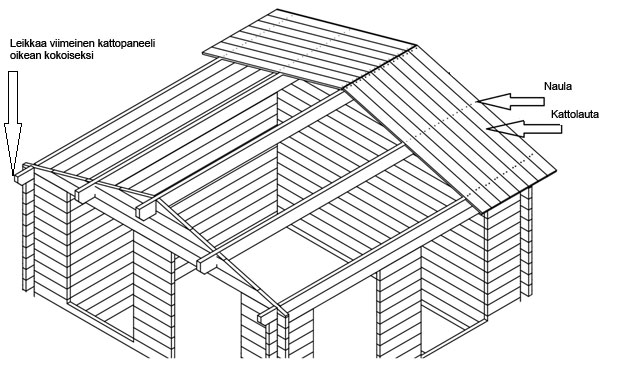
Place the first roof board evenly on the ends of the roof beams on the yard building side. You can start from the left side of the courtyard building and work towards the right side or do the opposite depending on which one suits you better. You can use wire or tape to help you install the ends of the eaves so that they are perfectly aligned.
All ceiling boards must be attached to the ceiling beams with nails. Use two nails per board for each rafter. The last rafter should be adjusted according to the overhang .
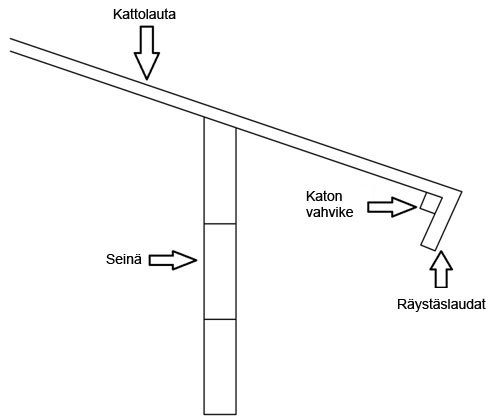
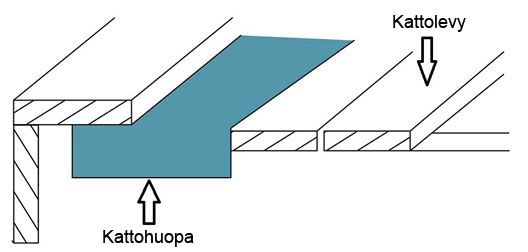
Attach the eaves boards and make sure they meet the upper edges of the roof. Screw the eaves reinforcements to the eaves. Finally, add roofing felt and/or roof boards on top of the roof. Make sure that the roofing felt hangs over the edges of the eaves by about 2 cm. In this way, rain protection is ensured .
Jälkeenpäin kiinnitä päätylevyt ja peitelistat kattoon ruuveilla.
6 Kuinka asentaa tasakatot, joissa on reunat
Kokoa seinät ja asenna kattopalkit. Ylimmän rivin laudat ovat helposti tunnistettavissa, koska niiden yläreunassa on aukot, (viillot/leikkauskohdat), joihin voi asentaa kattopalkit. Paina kattopalkit kunnolla kiinni niille varattuihin aukkoihin. Tarvittaessa naputa kumivasaralla.
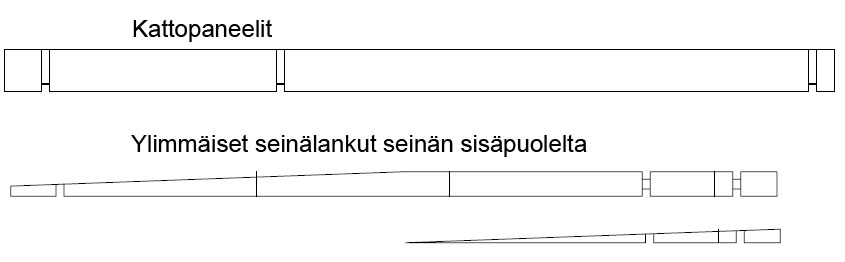
Kattolaudat ovat 7-10 cm lyhyempiä kuin sivuseinän ylimmäiset seinälaudat. Aseta kattolaudat tasaisesti tasoon ja sivuseinän lautojen päät ovat rakennuksen etupuolella (katon korkeampi pääty) ja siten seinälautojen päädyt ovat toisistaan 7-10 senttimetrin päässä rakennuksen takapuolella (katon matalampi pääty) ja kaiteesta, jonka asennat myöhemmin. Tämä 7-10 senttimetrin välimatka katon laidan ja kaiteen välillä tarvitaan sen vuoksi, että sadevesi voi pudota alas vapaasti ja siten rakennuksen takaosa pysyy kuivana ja vapaana kosteudesta.
Langan tai nauhan käyttäminen katon ylemmässä päädyssä voi auttaa asentamaan katon reunat täysin yhdensuuntaisiksi.
Aseta ensimmäinen kattolauta tasaisesti kattopaneeleiden kanssa rakennuksen puolelle. Voit aloittaa rakennuksen vasemmalta puolelta ja edetä oikeaa päätyä kohti tai toisinpäin, kumpi suunta sopii sinulle parhaiten. Viimeinen kattolauta tulee asentaa siten, että se säädetään ulkoneman mukaisesti.
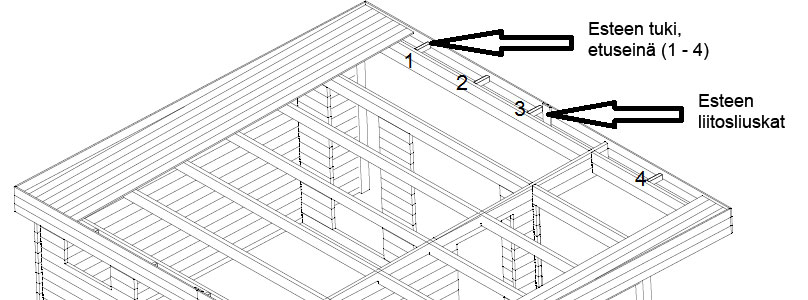
Katon reunoissa on pystysuorat kaistaleet takapuolella. Ennen kuin asennat etuseinään reunat, sinun täytyy tehdä kattolautoihin liitännät, joiden sisälle kaistaleet menevät. Tämä mahdollistaa sen, että voit asentaa reunukset tiukasti kattoon kiinni rakennuksen korkeammassa päädyssä.
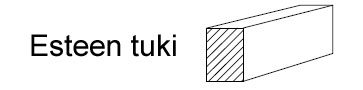
Kaiteet täytyy ruuvata kiinni kattopaneeleiden päätyihin sivuseinille ja ylimmäisten seinälautojen päihin rakennuksen etu- ja takapuolella. Etu- ja takapuolen kaiteet täytyy lisäksi kiinnittää ja ruuvata seiniin käyttämällä reunuksen kannattimia/tukijoita. Se tekee reunusteet tukeviksi ja vakaiksi.
Suurempien rakennusten reunukset voivat koostua 2 tai 3 osasta. Käytä reunuksien liitosnauhaa, kun ruuvaat ne yhteen.
Asenna reunapalat ensin etuseinään (korkeampi pääty), sen jälkeen sivuseiniin ja sitten takaseinään.
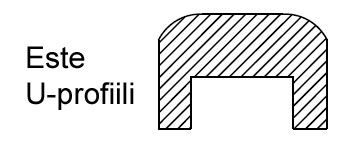
Reunojen korkeus (sijainti) ei ole täysin määritelty. Yleinen neuvomme on nostaa etuseinän este 5 cm kattolautojen yläpuolelle, joka on riittävä ja mahdollistaa kattohuovan asentamisen myöhemmin ja asettamaan reunat U-profiiliin reunuksen yläpuolelle.
Now that you’ve installed the barriers, it’s time to put the roofing felt in place. Start at the lower end of the roof. Put the first row about 2-3 cm to hang at the back of the ceiling, so that the ceiling boards are protected from moisture. The roofing felt must also cover the inside of the side wall barriers, and leave 1 cm extra and cut it later when you have put the entire roofing felt in place. Each subsequent layer/ row must overlap the previous layer/ row by at least 10 cm. In this way, you can avoid moisture getting under the blanket.
Once the roofing felt is in place, install the U-profiles to the edging using screws. The U-profiles must be cut to the right length and their ends must be at a 45 degree angle, at the four corners of the building.
When the roof felt is in place, it’s time to attach the U-profiles to the edges with screws. The U-profiles must be cut to size at a 45-degree angle for each of the building’s four corners.
7 Installing the terrace planking
The terrace boards must be nailed or screwed to the baseboards. Use two nails (or screws) per board for each baseboard. The terrace board must be installed in such a way that there is a 3-5 mm gap between each board. All Vierasmaja.fi courtyard buildings with a terrace contain impregnated boards.
8 Installing floorboards
The floor is put in place last to avoid damaging the floorboards. It is recommended to first treat the bottom of the floorboards with a suitable wood preservative. The floorboards can be installed from left to right or in the opposite direction. Use two nails for each board and for each baseboard. The differences of a few millimeters in the ends of the boards (in length) will not be noticeable after you install the decorative moldings ( in the next step). Some of the floorboards, as well as the last floorboards to be installed, need to be adjusted.
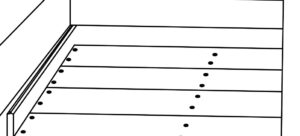
Now it’s time to attach the decorative moldings in place by nailing them at intervals of about 40-50 centimeters .
9 Installation of wind and storm shelters in 28mm buildings
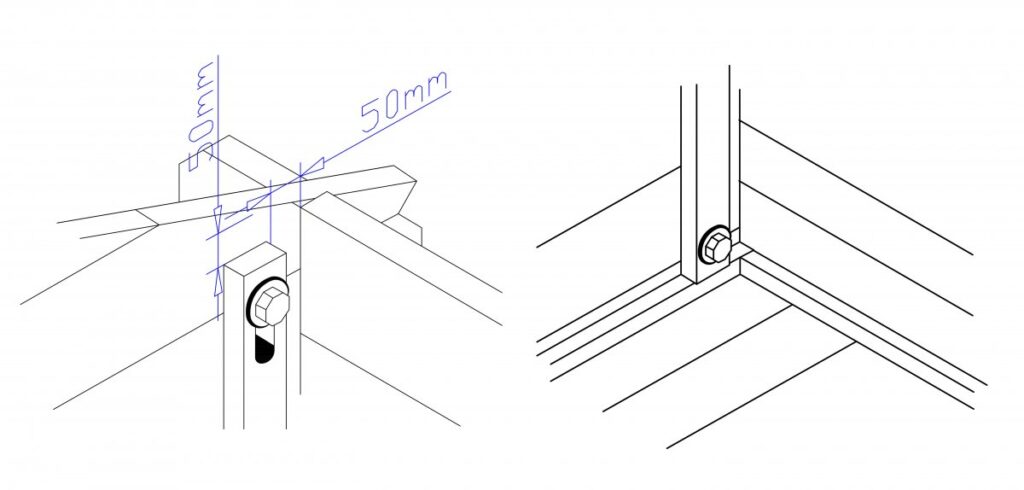
Finally, install the storm shelters according to the building floor plan, keeping them about 5 cm below the rafters and 5 cm from the outer wall.
Press the lower part of the storm protection against the decorative molding . Mark the upper and lower holes and drill the holes through the plank with either a wood or metal drill and use a 6 mm or 8 mm drill bit.
Attach the flap with the supplied screws. Screw them in by hand only, as the building can be damaged if they are screwed in too tightly.
Now your yard building is assembled and installed. We hope that you erected the building without any problems and that you are satisfied with the final result.
10 Vierasmaja.fi warranty conditions
We guarantee the operation of our products for five years (after delivery) in accordance with the following conditions. This warranty only covers the wooden parts of our products. It does not cover components and parts that are made either partially or completely from a material other than wood. During this warranty period, defective or missing product parts or the product itself may be replaced at our discretion. This warranty exclusively covers a free replacement for a similar product and delivery for defective and incomplete products. This warranty does not cover any costs related to tracking, installation, consequential damages, additional costs or returns/refunds.
The warranty expires in the following cases:
- if the installation/assembly instructions have not been followed;
- if changes (additions or changes) have been made to the product that deviate from the installation/assembly instructions;
- if the load has exceeded the permitted limits;
- if the product is assembled on an inappropriate foundation or on incorrect floor tiles, e.g. especially if the general guidelines of statics and architecture have not been taken into account;
- if the wood has not been adequately cared for (e.g. the wood has not been preserved or treated);
- if the wind strength has been over 7 (Gale Force) or if a natural disaster has occurred or in extreme cases, when the product has been misused.
- if the observed defects are typical for wood, such as color changes or other color defects, cracks affecting the appearance, warping, shrinking, swelling or other similar changes/events. (These are normal for wood material)
Claims for compensation must be filled out and submitted by email within the warranty period. The compensation claim must include the packing list number or order ID. Another condition for a warranty claim is that you must notify us immediately of the defect or damage, either by sending us pictures of them or by describing them in writing.